
1. Overview
The rich text editor is used to create and edit main content for QR code landing pages. It delivers a WYSIWYG (What You See Is What You Get) editing experience similar to Microsoft Word or WPS Office, allowing you to freely combine text, images, tables, hyperlinks and other elements just like editing a regular document.
1.1 Applicable Scenarios
| Scenario | Recommended Editor |
|---|---|
| Quick editing of illustrated text content such as product descriptions, campaign copy, nutrition facts tables, etc. | ✅ Rich Text Editor |
| Building polished marketing campaign pages or pages with custom layouts | ❌ Please use the Visual Drag-and-Drop Editor |
1.2 Editor Access Steps
- Log into the system and navigate to the Landing Page Management page.
- Click + Create New Landing Page, or select the Edit action for an existing landing page.
- On Step 1 “Select Editor”, choose the Rich Text Editor.
- On Step 2 “Select QR Code Landing Page Template”, pick a template (Blank / Built-in / Custom).
- Proceed to Step 3 “Edit Content”, where the rich text editor interface will load.
2. Interface Overview
The entire interface consists of two sections:
- Left Editing Panel: Page title input box + editor canvas
- Right Settings Panel: Save button + status indicators
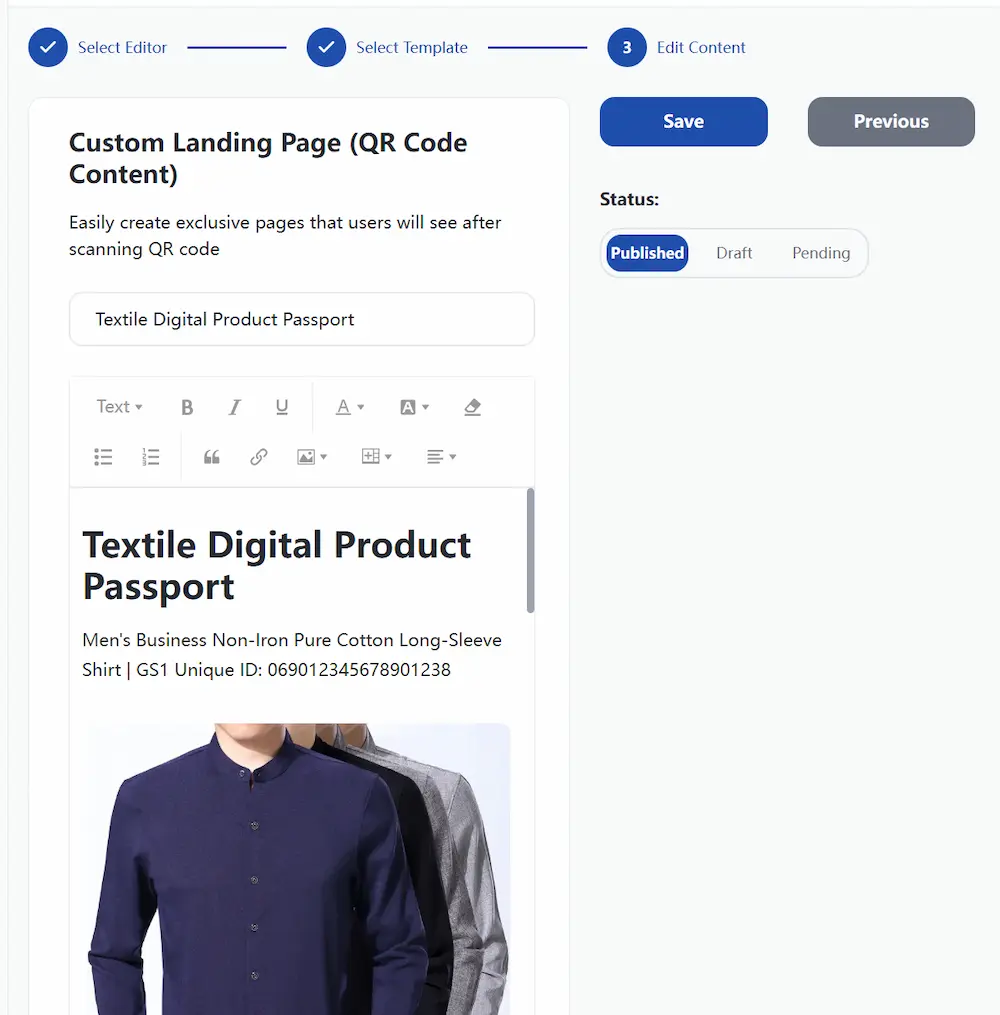
3. Title Entry
Enter your landing page title in the input box above the editor canvas.
- The title will display in the management list and at the top of the page users see after scanning the QR code.
- The title is a mandatory field; saving will fail if left blank.
- Keep titles concise and clear, e.g.,
Product Usage Instructions,Campaign Details.
4. Toolbar Function Breakdown
The toolbar sits at the top of the editor and is split into functional groups as detailed below.
4.1 Text Format Group
| Button | Function | Description |
|---|---|---|
| Heading Dropdown | Set paragraph as H1 / H2 / H3 heading or body text | Establishes hierarchical content structure |
| B | Bold | Select target text then click to apply |
| I | Italic | Select target text then click to apply |
| U | Underline | Select target text then click to apply |
| Font Color (Icon “A”) | Modify text color | Built-in color palette for custom color selection |
| Text Highlight | Set background highlight color for text | Highlights key terms for emphasis |
| Clear Formatting | Remove all custom formatting from selected content | Reverts text to default body style |
4.2 List & Quote Group
| Button | Function | Description |
|---|---|---|
| Bulleted List | Create unordered bullet points (•) | For listing parallel items |
| Numbered List | Create ordered numbered list (1. 2. 3.) | For step-by-step sequential instructions |
| Blockquote | Insert quote block with vertical left border | For disclaimers, customer testimonials, notes, etc. |
4.3 Hyperlink & Image Group
| Button | Function | Description |
|---|---|---|
| Link | Insert hyperlink on selected text | Paste target URL in the pop-up window |
| Image Dropdown | Three image import sources (see Section 6 for full details) | Web Image / Local Upload / Media Library |
4.4 Table Group
| Button | Function |
|---|---|
| Insert Table | Insert a blank 3×3 table at the cursor position |
| Delete Table | Remove the entire table where your cursor is placed |
4.5 Paragraph Alignment Group
| Button | Function |
|---|---|
| Align Left | Left-align paragraph content (default setting) |
| Align Center | Center-align paragraph content |
| Align Right | Right-align paragraph content |
| Justify | Full justify text for even left and right margins (ideal for long paragraphs) |
5. Basic Editor Canvas Operations
5.1 Text Input
- Click anywhere inside the editing canvas to place your cursor and start typing.
- Press
Enterto start a new paragraph; pressShift + Enterfor a soft line break within the same paragraph.
5.2 Text Selection Shortcuts
- Select a single word: Double-click the word
- Select an entire paragraph: Triple-click the paragraph
- Select all content:
Ctrl + A(macOS:Cmd + A)
5.3 Copy / Paste / Undo Hotkeys
| Operation | Windows Shortcut | macOS Shortcut |
|---|---|---|
| Copy | Ctrl + C | Cmd + C |
| Paste | Ctrl + V | Cmd + V |
| Cut | Ctrl + X | Cmd + X |
| Undo | Ctrl + Z | Cmd + Z |
| Redo | Ctrl + Y / Ctrl + Shift + Z | Cmd + Shift + Z |
5.4 Built-in Editor Shortcuts
| Shortcut | Function |
|---|---|
Ctrl + B | Bold text |
Ctrl + I | Italic text |
Ctrl + U | Underline text |
Ctrl + Shift + C | Copy text formatting |
Ctrl + Shift + V | Paste as plain text (strip all formatting) |
💡 Paste Tip: When copying content from Microsoft Word or webpages, first paste it into a plain text notepad before transferring to the editor. This strips extraneous hidden formatting code.
6. Inserting Images (Three Methods)
Method 1: Embed Web Images
Use this if your image is already hosted on a public web server.
- Place your cursor at the position where the image should appear.
- Click the Image button → select Web Image.
- Input the public image URL in the pop-up window (example:
https://example.com/photo.jpg). - (Optional) Fill in Image Alt Text (for screen reader accessibility and SEO optimization).
- Click Insert.
Method 2: Upload Local Images
Suitable for uploading small batches of image files stored on your device.
- Click the Image button → select Upload Image.
- Select local image files in the file picker window (supported formats: JPG / PNG / GIF / WEBP).
- The system will automatically upload the file to the server and embed it at your cursor position.
Method 3: Select from Media Library (Recommended)
Use pre-uploaded library assets to avoid duplicate file uploads.
- Click the Image button → select Media Library.
- Browse uploaded assets in the pop-up (24 images per page; scroll to load more).
- Single-click your target image (a checkmark ✓ will appear in the top-right corner of the thumbnail).
- Click the bottom-right Insert Image button.
💡 Empty Media Library Note: If no images exist in your library, a prompt will display: “No images found. Please upload assets first via the Media Library page.” Navigate to the Media Library page to upload files before returning to edit.
6.1 Image Editing After Insertion
Single-click any embedded image to access these editing functions:
- Drag the corner and edge control points to resize the image.
- Use the floating image toolbar to replace or delete the image.
- Adjust text wrapping via the paragraph alignment buttons in the top toolbar.
7. Inserting Tables
7.1 Create a New Table
- Move your cursor to the spot where you want the table inserted.
- Click the Table button → select Insert Table.
- The editor will automatically generate an empty 3-row × 3-column table.
7.2 Populate Table Content
- Click directly inside any table cell to type text.
- Press the
Tabkey to quickly jump to the next cell. - Each cell supports independent formatting (font style, color, bold, etc.).
7.3 Delete a Table
Place your cursor inside any cell of the target table, then click the Table button → select Delete Table. The full table will be removed instantly.
8. Insert Hyperlinks
- Highlight the text that will become the clickable link (text selection is required).
- Click the Link button on the toolbar.
- Enter the target website URL in the pop-up window (example:
https://example.com/product). - Click Confirm.
- The selected text will convert into a clickable hyperlink.
💡 User Experience Note: Links open in a new browser tab when users click them after scanning the QR code. To remove a hyperlink, place your cursor on the linked text and click the Unlink button that appears on the floating toolbar.